Let’s learn how to set up system environment variables in Windows.
What are Environment Variables in Windows?
Environment variables help Windows set up a software environment and act as information containers for all applications running on the operating system. Imagine an application that wants to know the path to a specific file on your computer. The program can either go through the entire system and keep searching until it finds the file. A more innovative way is to call the PATH environment variable that contains the paths to all the system files. Moreover, system environment variables also affect the installation of Java Development Kit, Java Runtime Environment, and other essential software. Just like the above examples, there are a plethora of small and extensive real-world use cases of environment variables that overall make Windows a snappier version of itself.
Types of Environment Variables
Windows creates and uses several environment variables, some of which are user-dependent and others remain the same for all users on a single machine. We can categorize environment variables using user dependence as a parameter and term them as system environment variables and user environment variables. Information like the location of temporary files from an account, location of your user profile, etc., are stored under user variables. Windows gives the user account the privilege to edit the user variables, but other user accounts cannot edit them. Other than this, Windows contains system environment variables created by the operating system, programs, drivers, and more. You cannot tweak the system environment variables, but Windows offers the option to tweak user environment variables’ values.
Methods to Setup System Environment Variables in Windows
You can set up system environment variables using different methods in Windows. Although the command line methods remain unchanged for all Windows versions, the GUI-based methods differ slightly for different Windows versions. Let’s look at all these methods in-depth.
GUI Based Methods
The GUI-based methods include using the Start search menu, the Run Window, and the Settings menu to tweak system environment variables. Let’s look at how you can access the GUI from various Windows versions.
Steps for Windows 11
Click on the Start Menu and search for “environment variables.” The “Edit the system environment variables” option will appear in the search results. Click on the same, and Windows 11 will display the list of all environment variables.
Steps for Windows 10
Go to settings and enter the “About” menu. Now go to “Advanced system settings.” The System Properties dialogue box should appear on your screen. Click on the “Advanced” tab and select “Environment Variables.” Windows 10 will now display the entire list of user and system variables stored on your computer.
Using Run Window
Press Windows +R to explore the Run Window. Now enter the following command:
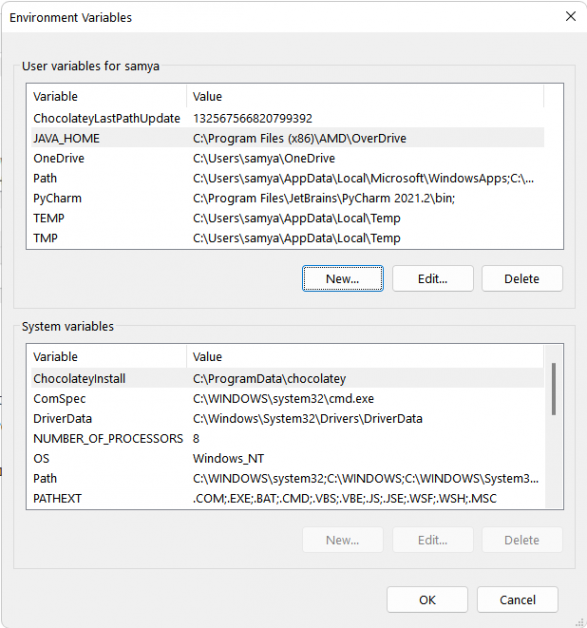
All these methods should open the list of all the environment variables categorized under separate sections for user and system environment variables. You can create new user variables, edit the existing ones, or delete them using the same dialogue box.
Steps to create a new environment variable
Click on the “New” option using the Environment Variables dialogue box. Now enter the Variable Name and its Value under the respective columns and press OK. Creating the JAVA_HOME environment variable is a crucial step for installing Java Development Kit. So, let’s create the JAVA_HOME variable and later verify its existence. Click on the New option and enter “JAVA_HOME” as the variable name. Also, enter the installation path for the JDK as the variable value for JAVA_HOME.
The JAVA_HOME variable is now visible on the list of all environment variables, with the variable value as the path to the JDK. You can verify it by going to the “edit system variable” settings, and the JAVA_HOME variable should be present right there.
Steps to Edit environment variables
Click on the environment variable you want to edit and press the “Edit” option. Now enter the Variable Name and its Value and press the OK button. Let’s now edit the JAVA_HOME variable that we just created and change its value to another folder. Click on the variable and select the “Edit” option. Now enter a different variable value replacing the previous value and click OK.
Here also, you can verify the changed value on the environment variable list.
The updated variable is present on the user variable list.
Steps to Delete environment variables
Click on the environment variable you want to Delete. Now Press the “Delete” option and press OK. As an example, let’s delete the JAVA_HOME variable that we recently tweaked. Select the variable and press “Delete” and “OK” subsequently. The selected variable gets deleted from the list of variables.
The JAVA_HOME variable gets deleted from the list.
Command Prompt Method
You can use the Command Prompt or Windows PowerShell to set up environment variables. Let’s first look at how to use the command prompt method.
Viewing the environment variables
Open the command prompt in Windows. Now enter “set” and press Enter. You can see the entire list of environment variables without any categorization, unlike the GUI-based method.
Creating new environment variables
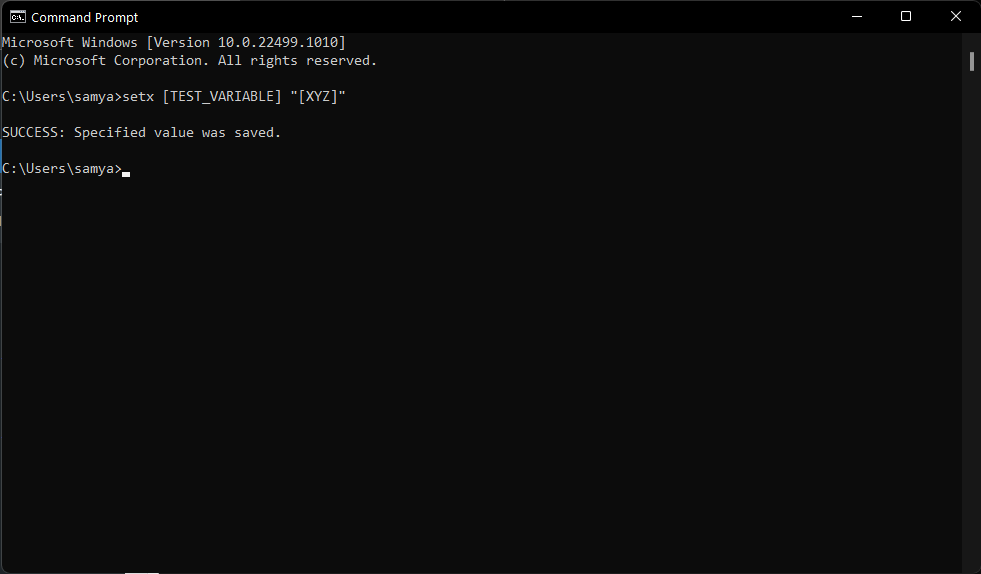
Open the command prompt. Use the following syntax using the setx command and press Enter: [variable_name] stands for the name of the variable you want to enter. [variable_value] stands for the value for the newly created variable. For example, let’s create a “TEST_VARIABLE” with a value “XYZ” and then verify its existence using Command Prompt. We use the following command:
Congratulations! You just created a new user variable using Command Prompt. Now, let’s verify its existence. Use the “set” command to see the list of all the variables.
Windows PowerShell Method
PowerShell gives you more flexibility with the environment variables and lets you view, edit, and create them, but these are only valid for a single PowerShell session. The variable list returns to its original form once you close a PowerShell session.
Viewing system variables
Open the Windows PowerShell. Now enter the following command: Windows PowerShell will display the complete list of environment variables. The environment variables won’t get categorized under system and user variables, but you can use the following commands to only view system variables using PowerShell: Otherwise, you can use the following command to only view the user environment variables:
Creating and Editing environment variables
You can edit and create new environment variables using the $env built-in variable. Use the following command to create a new variable using PowerShell: Here Variable_name stands for the name of the newly created environment variable, and the variable_value stands for its value. Let’s create another test variable TEST_VARIABLE as an example and then verify its existence. We use the following command in the PowerShell:
We have also confirmed the variable value for TEST_VARIABLE using the following code: PowerShell shows the output for the TEST_VARIABLE variable as [ABC]. Moreover, you can also tweak the value for an existing environment value using the following command: This would append the newly mentioned value to the original value for the environment variable.
Conclusion 🧑💻
Creating and tweaking system environment variables is crucial to direct programs and utilize their functionality. Windows gives you GUI-based and Command Line options to do the same. The GUI-based methods are simple and easy to follow. On the other hand, the Command-Line methods are swifter but more complicated. Now you may check Tuning MySQL system variables for high performance.

![]()


